"What do I need to do to take care of my bike?" is a question I get asked quit a bit. Having a clean and lubed drive train on your bike is important for good shifting, makes for a smooth feeling bike and will extend the service life of your chain, sprockets and chain rings. Cleaning the drive train is pretty easy to do, only takes a few minutes and is oh-so self satisfying when you're all done.
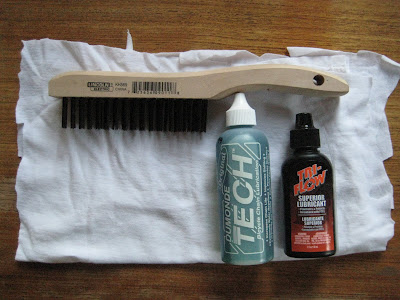
Supplies needed: A wire brush, lube, rags. That's it! As you might guess, I have the afore mentioned supplies all wrapped up in a handy dandy kit for sale for your drive train cleaning pleasure. Email me for details. 2 bottles of lube?? Yep, 2 bottles. The Dumonde Tech (the green stuff) is really, really, really good on chains. The TriFlow (black bottle) is a slightly better penetrating lube for derailleur pivots as well as a kitchen sink full of other uses both on and off the bike. Additionally, TriFlow comes with a handy dandy extension tube that fits into the end of the bottle making the job of getting lube into all those "hard to reach" spots an easy task.

Start by holding the wire brush on the inside of the chain and back pedal that thing until your hearts content. Keep some pressure on the brush/chain as you do this to really get in there and get the crud out. No, the wire brush won't hurt the chain. That chain is one tuff customer... trust me.

Next, move to the outside of the chain. To make this easy, shift the chain onto the big chain ring. Again, back pedal while holding some pressure on the wire brush.

To finish the chain, brush off the side plates. Don't forget the back side!

Next, clean the rear derailleur pulleys with the wire brush. Again, you're back pedaling the bike to do this. Go easy with the pressure of the brush so you don't bind up the drive train which will cause the chain to fall off.

Go back to the chain rings and give em' a scrub. It won't take long to get the grime off the rings.

As you get more comfortable working with the brush, you'll learn little tricks on where to hold the brush and angling the brush to really get into all the nooks and crannies. At some point, you'll have to shift the chain into a different chain ring to allow you to get all three chain rings. (or however many you happen have).

Next, go to the cassette and get to work. If your bike is in a bike stand, pedal forward slowly and move the brush to different areas of the cassette. Be careful not to get your brush/hand/fingers tangle with the spokes of the wheel as it's spinning. If you're working on the bike on the ground and can't pedal forward, patiently use the brush back and forth to clean things up. Again, you'll have to shift the chain a few cogs to clean the entire cassette. At this point, you're done with the wire brush.

Get in your kit and grab a rag. Use the rag like dental floss to get in between the cassette cogs and make em' look new. The first few times you do this, it will feel (and be) a bit cumbersome. In time, you'll be a cog flossing pro and "wowing" you fellow riding partners with how clean you bikes' drive train always seems to be.

Move down to the rear derailleur and clean up the jockey pulleys. Use light pressure with your fingers and back pedal to clean the pulleys.

The rear derailleur has 10... count em'.... 10 pivots on it! Get in there and clean them up as best you can. You won't get them perfect, but that's OK. Just try and get the majority of "gunk" off. While you're at it, clean up the pivots on the front derailleur as well.
Now you're ready to put some lube on there. BUT... before you do, take a minute to visually inspect the chain, chainrings and cassette cogs for anything out of the ordinary like bent teeth or twisted links on your chain. Problems are easier to spot when everything is clean and much nicer to fix as well.

Take the TriFlow and lube all of the pivots on the rear derailleur. You only need a drop or two on each pivot.

Same thing for the front.

Next, take the Dumonde Tech and lube the chain. I like to lube on the inside of the chain because that's where the chain is coming into contact with the chain rings and cassette. Use the lube sparingly. You really only need a little bit on each roller of the chain. How much is a little bit......
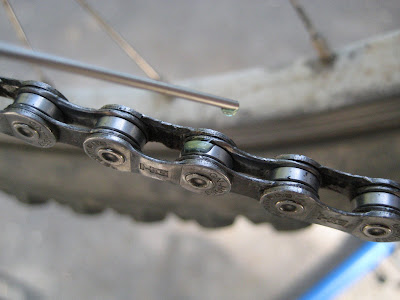
..... it's about like this. You're trying to avoid getting lube all over the side plates of the chain. An over lubed chain will just attract dirt and grime making your next clean-up more tedious than it needs to be.
So, at this point, you've got lube on the chain, and all of the derailleur pivots. Slowly shift through all of the gears. This helps to work the lube into the chain and derailleur pivots. The more you do this the better. It's best to let the lubes "marinade" a little while. A few minutes is adequate. To finish, wipe off the excess lube from the chain and derailleur pivots and GO RIDE!!!!

Chain rings before.

Chain rings after.

Jockey pulleys before.

Jockey pulleys after.

Cassette before.

Cassette after.

 Well, it happened. I did my last job in the truck and took a step back to get one last look at the "old girl" before pulling all the tools off the wall. Within' minutes, all the tools were in boxes and I was lying underneath the truck unbolting the bracket that holds the tool board in place. We had a good run ole' girl, but it's time to move on.


 Next was making some access holes in the bench for the support cables and installing a latch to keep the bench up when in drivin' instead of wrenchin'.
 The empty beer bottles on the previous photo were the result of getting these bolts in place. Getting this bolt fed through the side of the door frame was no easy task... trust me. The access hole for the bolt is around the right side
  Once the support bolts were in place it was time to put them into action and run the cables. With a 750lb load limit the bench is ready to take on some frozen bolts, stuck pivot pins or anything else that needs some serious "elbow grease" behind it.


 Aah. The pivot. Designers of full suspension bikes aren't the only ones loosing sleep over just EXACTLY where the pivot point should be. It's equally as important on a 100lb wall of tools that will swing into or out of the work space.